Wednesday, November 20, 2013

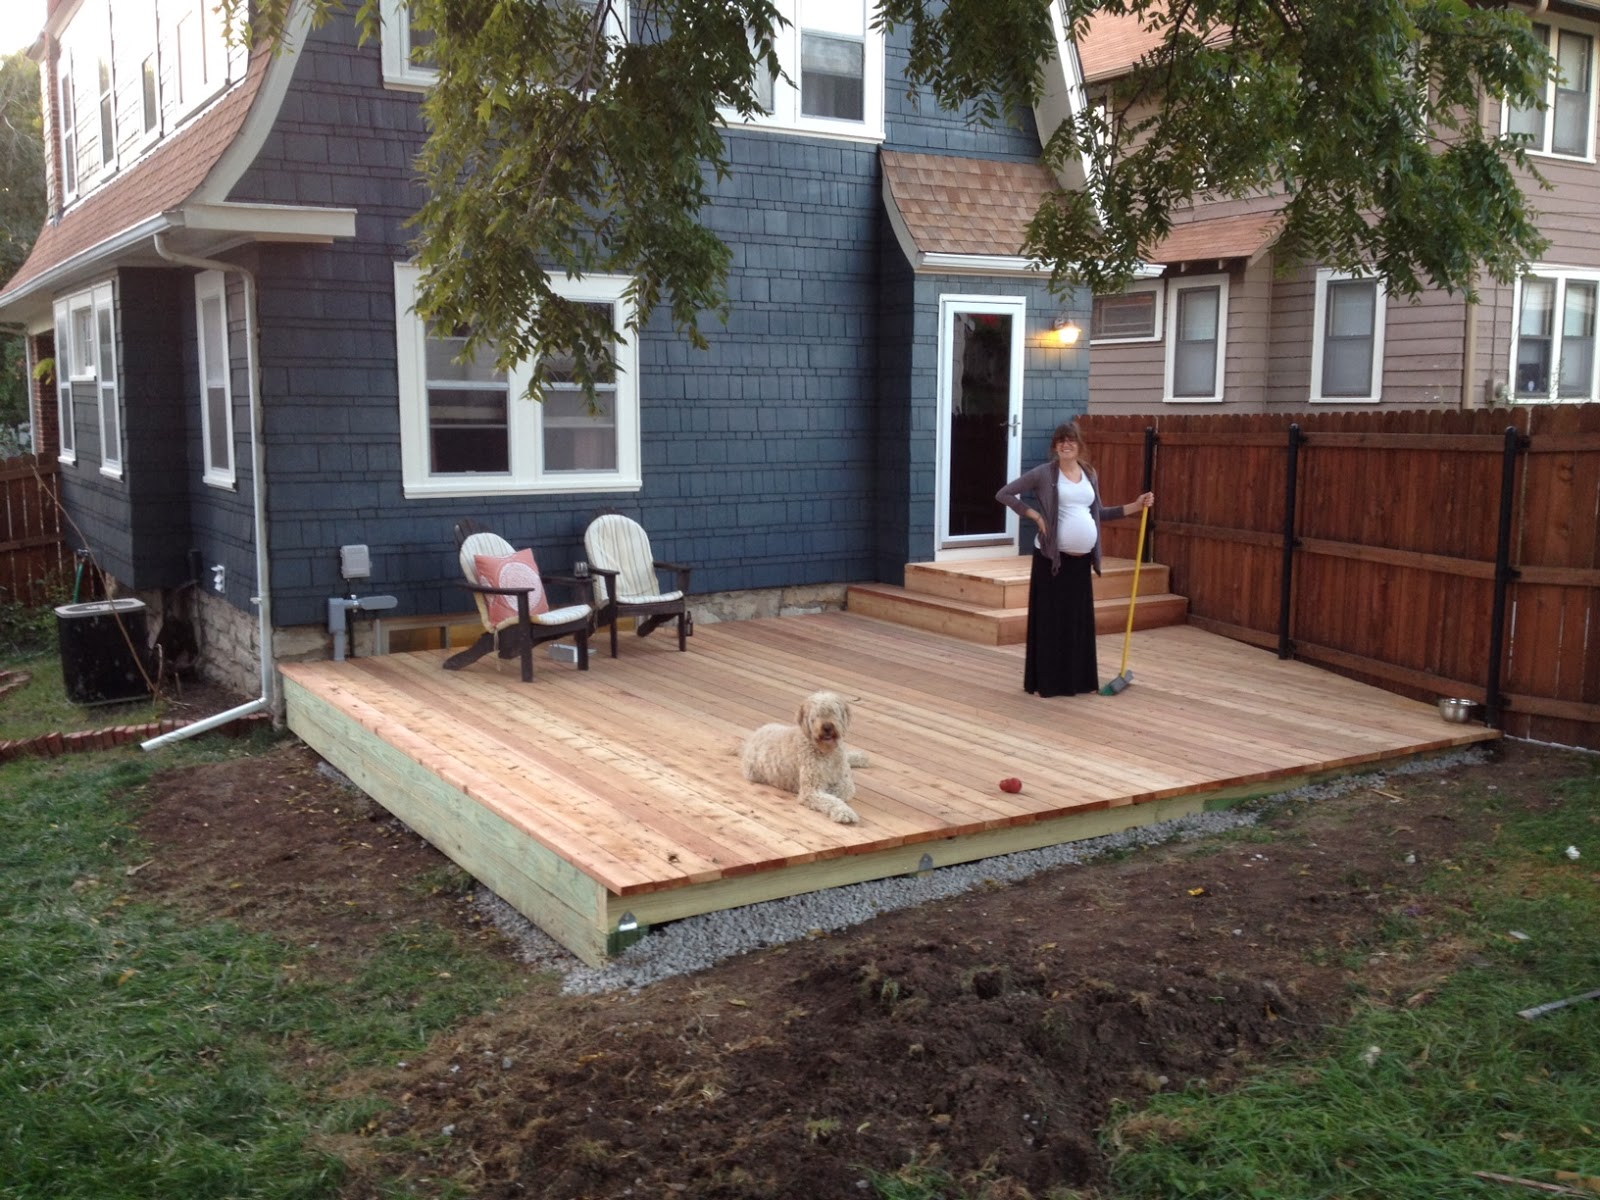
Building a Low Ground Cedar Deck

Our backyard was in shambles when we got this house 5 years ago.

Bit by by bit, we've been improving things, working from the back of the yard, towards the house.

Before we started on the deck, I had a company bury our electrical and internet lines to the house. It costs to have the company bore the tunnel, but not trenching was really nice, and it also saved the lawn.

Now to the deck.

We elected for cedar. Mostly because it handles the outdoors well while being a pleasant softwood material. I like how it feels barefoot, it smells great, and its just a fun wood to work with.

My biggest goals were to have it be simple, seamless and straight. One of those decks that sorta blends into the larger landscape and is easy to access from multiple points.

I had to keep the deck low to the ground for privacy reasons. Since our street is sloped, its pretty easy to see into the neighbors yards. This low-to-the-ground detail presented some challenges that required alot of digging and workarounds.

Electrical now connects from back of garage to pole, shooting underground to house.

Looking out from the backdoor, you can see post holes and some trenches for the beams.

Looking towards the house from back of yard, notice the concrete steps to the house.

Lots of strings helped me visualize the size of the deck and where to dig holes for posts.

Once I was ready, I poured water into the hole and added concrete, stirred with a compost mixer.

Don't use twine for strings, as they quickly lose their tension and/or break. Use the pink mason string.

Progress with a few posts and metal fixtures attached.

All the posts supports poured and ready.

I had to level the stoop's last step as it was going to support the decking. This also told me how low I could get to the ground.

I started laying beams with the corner that required the most digging and worked my way out.


Framing around fence and stoop. There was lots of improvising working around the old stairs.

I added gravel when the wood was close to the ground.

Framing and joists done, now to the decking - the fun part.

The trick to straight planks is starting with a good straight end piece and being patient. Each piece has a slight bow, so you need to pull and push ever so slightly to stay even across the deck. We used a wonderbar and a long wood clamp to pull the decking together when necessary.

Instagram version of deck.
Decking added with dog and wife to test. Lots of extra dirt helped us grade our yard.

I used the "camo nailer" to hide our decking screws, and 18' planks so we didn't have any seams. I think they are liking the deck.

Remember the concrete stoop? We built on top of it.


I stained the deck with Penofin in their "Sierra" color. It also matches our fence.

After looking at some options, we decided to paint the risers with Sherwin Williams Duration Creamy White for contrast.

We moved our park bench to the top of the hill to break up the empty space out there. We painted it to match the Walnut tree leaves in October.

Cedar fascia boards were added around the perimeter of the deck for a clean look. Sod added too.

Wednesday, September 11, 2013

Blue Never Felt So Good


Pardon my melodramatic writing for this one post.

We started painting this old house 24 months ago. It started during our kitchen remodel. Painting was something cheap that we did to keep us busy while we watched the contractors work inside. Since then, we've been chipping away at the project, side by side. Each side took about 3-6 months to complete. Winters and summers also slowed us down.

One added detail to the painting project - I also decided to refinish/replace each shingle before the paint. Anyone can paint a house, but most aren't willing to go to the trouble to scrape, refinish and caulk every nook and cranny.

This year we finished the south wall, and in a rush to finish the front of the house, I elected to hire a contractor to replace all the old shingles with new.

I would say this was the most difficult and physically demanding project we've taken on. I went through 4 orbital sanders, 14 boxes of shingles, 50 tubes of caulk, and thousands of sanding pads.

We're happy with the results, and more happy to say we're done! Enjoy.

The carpenters started on the left edge and worked to the right, bottom to top, sections at a time.

Carpenter's progress at end of day 2. We had to buy 11 boxes of shingles for the front.

Completed shingles before paint. I stripped the window trim and fascia boards after they left.

This type of project definitely requires a helper. The porch roof really helped them out with easy access.

Pregnant wife helping me out with painting. Worst husband or best wife ever? 

Painting done, with a lovely lady at the door.

Kinda looks like a ship at this angle.


A month before we bought the house.

4.5 years later.
Before/after.

Monday, August 26, 2013

Baby Room Book Ledge

Red oak book ledge with some of our favorites on display

B suggested we make a book ledge in the baby room that goes across the long wall. Thankfully, with a bunch of old oak left over from our kitchen remodel, I can make these in a matter of a few hours.

The vertical trim piece of a doorway is almost perfect for this type of project. I ripped the piece so it's about 3" wide, and nailed on smaller strips on the back and front ledge to create a channel for the books.

We debated on painting it white, but B elected for the dark wood stain.

Installing requires locating a stud, so we ended up drilling a bunch of tiny holes behind the ledge until we hit something solid (the joys of plaster and lathe).

I think we may add another eventually, but for now, I like the simplicity of one long shelf across the room.


Should hold books until the kid tries to climb the wall with shelf.

You can see where we made some pencil marks for alignment

Monday, August 19, 2013

$20 Antique Door - Score!

A few weeks ago I went to Habitat ReStore in Kansas City for fun on a lunch break. I joke that casual trips to ReStore are "dangerous" because you will walk into the store with no intentions of buying and leave with an unplanned weekend project.

My last trip was a classic example. We quickly stumbled upon a pile of $20 two panel closet doors that perfectly match our house's style. I reluctantly texted B a picture (below), knowing this would pique her interest.


Fast forward 4 hours later, and we're rushing across town in our van to buy three of these doors for our upstairs closets. We could have bought more, but since these all required stripping and refinishing to match our house, I didn't want overcommit to stripping (see exterior house project).

Well, once I got to "stripping," things got really messy. I'll spare you the pictures, but it did take an entire bottle of this stuff to get about 6 layers of white paint off the doors.


The exciting/scary part of doing this is that you have no idea what wood type and finish you'll be left with. I was afraid it would be cheap pine and be a total waste of time. Thankfully, the wood was beautiful and stained up perfectly!

Total time was about 12 hours. I spent about an hour every weeknight for two weeks, and then finally hung the door this weekend.

Here's the skinny 24" closet door in all its restored glory

We kept the original doorknob and spray painted it oil rubbed bronze

The doors ended up being a beautiful pine. I love the thin grain on the frame. Also, we cut out the original panel trim and replaced them with a simple shaker style trim. This saved loads of stripping time.


I absolutely love the idea of restoring old things - the only risk is that sometimes you'll end up spending ridiculous amounts of time and $ to restore that cheap item you found. With this project, I probably spent $50 on this door, including some new materials, like trim, bondo, and fixing some door jamb hardware. The time was a little bit much, but it quickly became a labor of love, so I have no regrets (yet).

New doors like this cost about $240 each, so I think we did ok.

And just for reference, here's the before/after pic.


Tuesday, July 30, 2013

Painting Progress: Three Sides Done

Look what we finished this weekend . . . .


Current painting status is three sides done, as well as the front porch - leaving just the front 2nd and 3rd stories to sand and paint. I'm starting to believe this project might actually end some day . . . .

Friday, July 26, 2013

Mobile Modifications

One of the very first things I purchased for the nursery was this mobile, from seller WildChildShop on Etsy. I decided early on that I liked the idea of a mobile that would move naturally in the breeze from the van or vent in the room, and wanted something made of natural materials that would fit well with the decor of the room.

Online this one looked perfect - I loved the rustic wood, and the cranes hanging from it are made of maps, giving it great blues and greens for color, and the lightweight strings and cranes should have lots of natural movement.


When it arrived, I loved it instantly. The cranes, held onto fishing line by little pearls, were so colorful and sweet, and it had a very light and airy feel. The one part that bothered me a little was the branch at the top. It was not quite as rough and rustic as the one in the photo, and felt a bit heavy compared to the rest of the mobile.


So it was Carpenter Chris to the rescue! He went through wood scraps he keeps on hand, and came up with this very light and sweet solution. These two pieces of oak, measuring about 1/4" x 1/4" x 12" each, provide a nice light, simple top for the mobile, and match the tone of the room much better.


From there it was a simple matter of drilling and staining the wood to get it ready to hang. The original mobile came with three strands of cranes, so I cut a few cranes off the bottom of each strand and strung them up on some new fishing line to create a fourth, reusing the pearls to hold them on the line. A little more fishing line to string the whole thing to the ceiling (from a little hook I spray painted oil rubbed bronze, to match the rest of the hardware in the room) and we're done! 


And here's perhaps the most important angle - crib's eye view. I love the X in the middle with the cranes lined up on the corners, and the fun shadows it casts on the ceiling in the lamplight.


So for exactly $0 (using fishing line and wood scraps we already had, and rearranging cranes and pearls from the original mobile) it's an even more custom piece than it already was - all ready for our little guy or girl to gaze it sweetly after sleeping all through the night, every single night. Right? Hello?

And now, for the current state of the nursery. Here's what you see looking in from the hallway:


Standing by the closet door:


And sitting on the chaise lounge in the corner:


It's really beginning to feel like things are coming together (other than the mess of stuff we're currently storing in the crib), but there is still a lot to do. Our next steps are:
  • installing baseboards
  • adding a rug
  • recovering the chaise lounge
  • adding hardware to the dressers
  • replacing closet doorknob 
  • hemming the sheer curtains
  • making a few pillows for the chaise and rocker
Once these steps are done, we'll be on to the fun stuff - accessories! I've been collecting lots of great things to decorate the walls, and we have a few projects planned as well to finish things off.

Oh, and Wrigley wants you all to know that you don't have to worry - the last piece of the mobile did not go to waste!


twitter test